Showing posts with label Tatting. Show all posts

Tuesday, September 22, 2015

Tatting Tuesday - What I've been doing instead of tatting

This is what I've been doing lately instead of tatting.

Master bathroom shower floor
The floor of our shower in the master bathroom developed problems.  The "mud" or concrete under the tiles had begun to break down, making the floor uneven, cracking the grout and causing a leak. Luckily for us, the bathroom is over the garage, so it only dripped on the garage floor.

I tried to do a quick fix, which left the tiles uneven and the grout kept cracking loose. And, it only stopped the leak for a little while. 

Now I am attempting a more thorough fix, removing all the tile and the loose "mud" underneath, patching the mud, and installing new tile.  This is the patched mud, which still needs some smoothing and evening out. Then I can put down new tile, grout it, and thoroughly seal it.  Hopefully this will stop the leak for a long time.

Larry

Tuesday, September 15, 2015

Tatting Tuesday - Snow Dragon Wing Done

The second wing of the Norwegian Snow Dragon is finally done and attached to the body!  Yay!

Norwegian Snow Dragon - Tatting complete
Now all I have to do is work in the ends, and block and stiffen it.

This was quite a project.  Easily the most complex I've done, and not just because I had to learn new techniques (like the Single Shuttle Split Ring). Now I'm looking forward to something simpler, like helping Grandma with a few projects of hers.

Larry

Tuesday, September 8, 2015

Tatting Tuesday - Almost Ready to Fly

The second wing on the Snow Dragon is ready to be joined to the body and worked through the last row.

Snow Dragon - Second Wing ready to join
Of course, this work would go faster if I wouldn't make so many mistakes....

Larry

Tuesday, September 1, 2015

Tatting Tuesday - Second Wing Progress

Progress on the second wing of the Snow Dragon is pretty slow.


It is quite a complicated pattern, and easy to go astray. But I think I'm getting comfortable with the pattern, if I would only stop making mistakes.

Larry

Tuesday, August 25, 2015

Tatting Tuesday - One-Winged Dragon

I finally completed the first wing of the Minor Norwegian Flying Dragon.

Minor Norwegian Flying Dragon - One Wing Complete
It was very complex, using two shuttles at once almost throughout, and switching primary shuttle back and forth on alternate rows. And joined to the body in several places on the last row.

Now I can start working on the other wing!

Larry

Tuesday, August 11, 2015

Tatting Tuesday - Dragon Wing Progress

I took the pattern for the Flying Minor Norwegian Dragons, which I had found to be very complex and confusing, and broke it down further into instructions for each shuttle used on each feature. Maybe I'm just too new to tatting, but I could not keep straight which shuttle was supposed to do what once I got past the first couple of rings.

With the augmented pattern, and working in two colors for clarity, I was able to produce:

Dragon Wing two-color test using Augmented Pattern
This is what the wing is supposed to look like, up to the point I ran out of gold thread on the shuttle. The fourth (and last) row on the wing is very similar to the third row, except for joining to the body in several places.  It should not be too bad.

With the tested new pattern in hand, I have begun an all-white wing.

Snow Dragon Wing using Augmented Pattern
I can see I've already made one mistake: the second ring on the left side should not have a picot on it. Oh, well, it should not disrupt the structure of the remaining work, and maybe the wing will look good with one more "claw" on the leading edge.  As long as I remember to make a matching mistake on the other wing, I think it will be okay.

Larry

Tuesday, August 4, 2015

Tatting Tuesday - Snow Dragon Progress

Last week I had finished the body of the Snow Dragon from the Flying Minor Norwegian Dragon patterns, and I was looking forward to completing the wings and putting it together. Unfortunately, I haven't gotten very far on the wings.


Snow Dragon Wing (started)
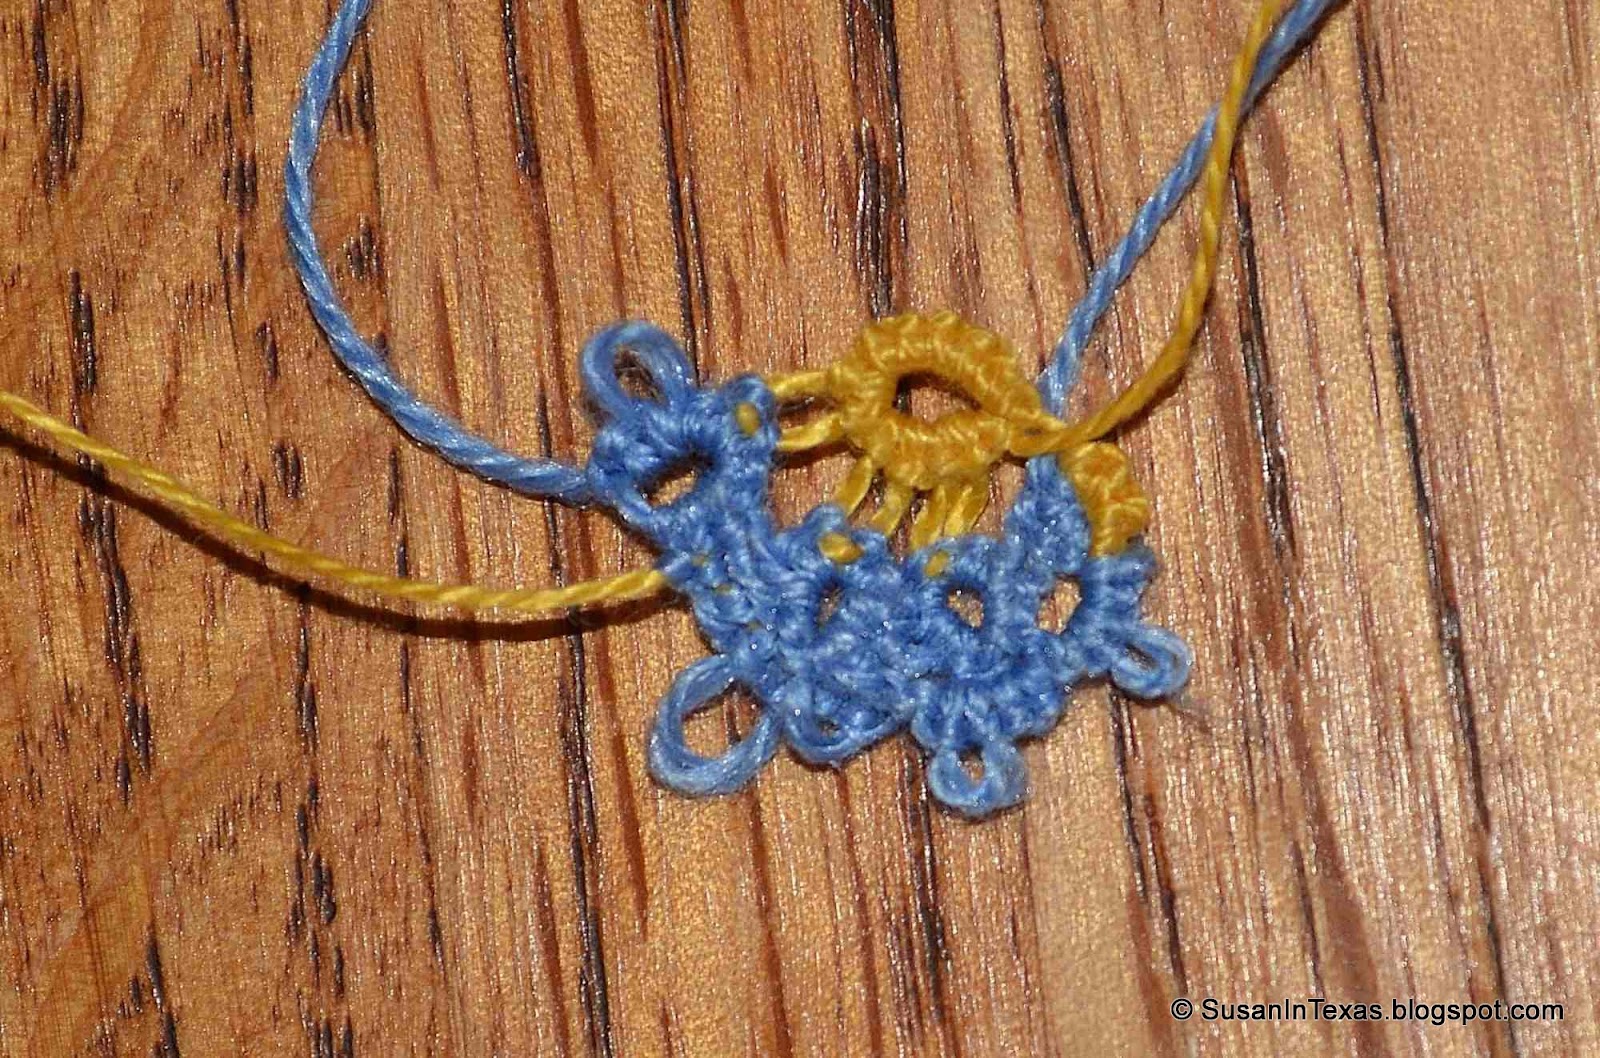
I found out that these dragon wings are very complex, working with two shuttles and making rings, chains, and split rings with both. It is especially hard to keep straight when worked in the same color thread. I have started working a test piece in different colors so that I can see better how the different threads work together.


Dragon Wing Test
From the pattern, this is how the wing is to start, with the upper ring and the outside half of the split ring (on the right) in one thread (that is, from one shuttle), and the rest of the row worked from the other thread (from the second shuttle).  Then it gets really complicated.  

I think I am going to have to work out how to break the pattern down even more, so that it tells me not only what stitches to do, but also which shuttle to do them with.

Larry


Friday, July 31, 2015

Friday round-up: Crocheting, Tatting and Knitting

Grandma has been on baby jacket kick again, so I have brought her latest creation home to complete the fancy edging.  She does not like to do that part anymore!  I don't mind; this is the yarn we gave her at Christmas, and it is very soft and lovely to work with.


Larry has completed the tatting for this handkerchief that Grandma started.  His tatting has gotten so good!  The only difference I can tell between his tatting and Grandma's is that his rounds are a bit further apart from one another.  I will have to mind my stitching to keep the rounds the same distance apart on the hankie. Constant vigilance!  lol


I finally finished the scarf I have been working on at Grandma's place.  The skein seemed to be endless.  There was a large, poorly handled knot towards the very end of the skein.  I decided that was a sign, and ended the scarf before I had to deal with the knot.  It is certainly plenty long.


We are having a bee this Sunday.  Perhaps I can finish edging the baby jacket and the hankie there, then I won't have to schlep my sewing machine along with me.

Happy stitching,
Susan in Texas

Tuesday, July 28, 2015

Tatting Tuesday - Snow Dragon Progress

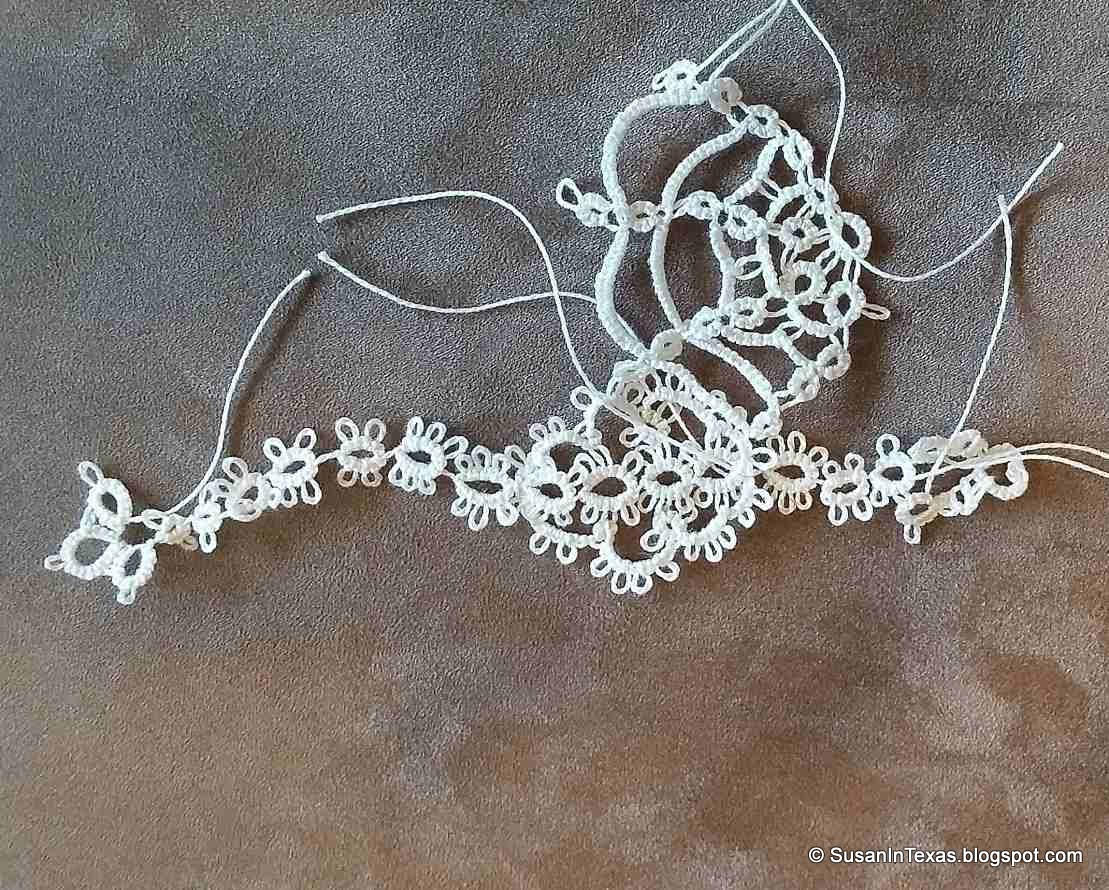
My new tatting project is a Flying Minor Norwegian Dragon, from a free pattern posted on the internet by Anne Bruvold.  I stumbled across it while I was looking around for animal patterns, and I thought it looked mighty cool.


Flying Minor Norwegian Dragon - Head, Body, and Tail
This is a Snow Dragon, since it is all in white.  The linked pattern also identifies several other color variations, and suggests there might be others not yet classified.

The basic shape of the dragon is very easy to see, from the tip of the snout, down the neck to the rounded body, to the barb at the tip of the tail.  The threads where the neck joins the body are not part of the wings, although they are suggestive of where the wings will be eventually.

Part of the challenge of mastering these dragons is the use of a new (to me, at least) technique, the Single Shuttle Split Ring (SSSR). All the rings of the dragon's backbone are SSSRs. The pattern does not explicitly teach you how to do the SSSR, but does provide a link you can follow to find instructions on how to do it.

I am just starting on the wings, which are started separately and each is joined to the body as you work it.

Soon I should have a Snow Dragon to bring me cool thoughts during these hot summer months!

Larry

Tuesday, July 21, 2015

Tatting Tuesday - Multicolored Bookmark completed, Handkerchief Edging Progress

The completed Beginner's Bookmark, with minor modifications:
Multicolored Beginner's Bookmark

The multicolored thread really makes this a fun item.  We tried a number of ribbons from Grandma's extensive collection, but the white worked best, making all the colors pop out brightly.
On the hankie edging front, I stopped when I thought I was a few rings short of having enough to finish.  I expected to have Susan stitch the edging to the handkerchief until she got close to the starting point, and then I could see exactly how many more rings to make.  But when I checked with Susan, she was afraid I had made too much!  

Grandma's (and my) Handkerchief Edging
Susan says when she stitches the edging down, she will try to space the rings the same as Grandma's, so we will see how much the edging stretches around the hankie.

Larry

Tuesday, July 14, 2015

Tatting Tuesday - Multicolored Bookmark Progress and Next Project

This is a pretty simple bookmark pattern (it's even called "Beginner's Choice") from the book Tatted Bookmarks - Needle & Shuttle.  I thought it would be fun to do in a multicolored thread, instead of boring old white :).


Multicolored Bookmark
I made a couple of changes to the design, mostly because I didn't have the pattern handy when I came to the end of the row.  There are fewer picots in the arcs on the ends, and I joined all three picots on the end rings to the ones next to them.  But, it doesn't look like an issue to me.  Now I just need to work in the ends for my start and finish (at the upper left) and from fixing my mistakes (on the right end).

For my next project, I will be helping Grandma finish a tatted edging for a handkerchief. She said she was finished, but it looks like the handkerchief was a bit bigger than she expected.

Grandma's Tatting for Handkerchief - a little short
The pattern is not very complex, but I will be trying to imitate Grandma's stitching that is already sewn onto the handkerchief, so I will have to be careful.

Larry

Tuesday, June 23, 2015

Tatting Tuesday - Edging Test Completed

I completed the test piece for the tatted edging I wanted to try.

Edging Test Completed
Susan suggested that I try ironing the piece when finished, steaming out the twists and crumples that tatting had worked into it. I followed her suggestion, and I think it really improved the look of the finished work.

Larry


Tuesday, June 16, 2015

Tatting Tuesday - Edgings

This week I am switching back to tatting.  I am not giving up on crochet; I still have a lot to learn, and I'm sure that it's one of those things that only gets better with lots of practice.  

But I don't want to forget all about tatting either.  So I am working on a short piece of Edging #2 from Elegant Tatting Patterns (Janet Carroll)


Edging #2 - Just a couple of repeats

This is a pattern where you work one direction until you have the length you want, and then stop and work back to where you started. The final result looks like this.


So far, I have done the first row and just started on the second. This is done with weight 30 thread, and it seems like it will turn out a bit heavy for a handkerchief.  Does anybody know what would get an edging like this? Are there general guidelines for thread weight and pattern width for different uses?

Larry

Tuesday, June 2, 2015

Tatting Tuesday - Crocheted Edgings

I am gradually branching out in my crocheting.  Last week, granny squares; this week, edgings.  I started with a larger yarn and hook, and worked on a pattern from one of my grandmother's crochet books while I was in Shreveport visiting last weekend.

Crocheted Edging - Yarn and D/3 Hook
Looks more like a tiny tiara than edging, doesn't it?  I think I am beginning to develop a better feel for how tight to work. Previously, my stitches were so tight that it was hard to get the hook with the thread back through the loops!  Now I am finding it easier to make the stitches, and it is faster, too.  I finished the piece above in an afternoon, while Susan and Grandma took a nap!

Having improved working with yarn, I was eager to try something much smaller to work with.  Here is the same pattern (if I am remembering it right - Grandma still has the book in Shreveport), working with 50 weight thread and a size 10 hook.

Crocheted Edging - 50 wt thread and 10 hook
You can see the shells in the pattern appearing. This is a lot trickier, but I can see how the looser stitching applies to this level as well.

Larry


Tuesday, May 19, 2015

Tatting Tuesday - Furnace Replacement

Doesn't look much like tatting, does it?


New Furnace
I scheduled our furnace replacement starting yesterday, for some crazy reason. With all the disruption that caused, I didn't get any tatting done :( . And the installation will continue today, so I probably won't get any done today, either.

Also, my lovely wife has decided that I started learning to crochet with too hard a pattern.  Apparently I don't even know what I don't know.  So I am switching to a beginner granny square pattern, and getting personal instruction on how to do it right.  First lesson: don't try to make it so tight!  Hopefully, I will soon be able to crank out a granny square quickly, and can think about what to make with them (an afghan, or maybe a scarf).

Larry


Tuesday, May 12, 2015

Tatting Tuesday - Hearts Bookmark

After some struggles, I finally completed the Hearts bookmark from Tatted Bookmarks - Needle and Shuttle (Handy Hands)I think I still need a lot of practice, and a lot of work on my consistency. 


Some of the hearts came out very nice (I think the second from the right is the best), and some are just odd.  The little ring with picot at the bottom/point of the heart was particularly tricky; it never wanted to work in neatly when starting on the arc that followed it.

Larry


Tuesday, May 5, 2015

Tatting Tuesday - Progress

I was going to post today about finishing my Hearts Bookmark project, after correcting my mistakes in a previous post.  However, I haven't made a lot of progress since last week. All I've managed to do is put one set of the top arches on a heart, before making a new mistake.


Little Progress
I'm certainly seeing firsthand how crochet is a lot faster than tatting, and unbelievably easier to undo mistakes!  So far I have already started with a little practice piece to learn the basic stitches.


Learning basic stitches
And I've started a project (a bookmark - what else?), beginning with a long chain and double crocheting back in what I hope will be an interesting pattern.


Beginnings of a bookmark
I will try to keep up with my tatting projects better, as well as explore my new hobbies.

Larry

Wednesday, April 29, 2015

Tatting Tuesday (on Wednesday)

Going on vacation can certainly throw off your routine! So this week Tatting Tuesday will take place Wednesday.


Heart Bookmark

Previously, I had posted about a bookmark project where I needed to correct mistakes. First I needed to correct a missed ring on the third heart.  Then I needed to make more hearts to complete the bookmark.


The Parts of the Solution

Finally, I needed to work in the ends of the separate pieces, and trim off the excess. 


Now I need to work arcs over the tops of each heart, and this bookmark will be finished.

More soon,

Larry

Tuesday, April 21, 2015

Tatting Tuesday - Hearts Bookmark Progress

My latest project is a bookmark consisting of a string of hearts.  I am working it in 20 weight thread, a bit smaller than my last project.  I do, however, have a big ball of this thread, so I shouldn't have to worry about running out!

Hearts Bookmark
I will have to figure out how to correct my error on the third heart, where you can see I missed the little ring that drops down from the heart.  I think I can make a separate ring, and attach it later. But I'm sure it would have been easier to do it right the first time!

Larry

Tuesday, April 14, 2015

Tatting Tuesday - Running out of Thread

For my latest tatting project, I was working on a border out of one of my Grandma's books (Orkis, by Nikolajsen and Nikolajsen). The pattern is for a handkerchief border (in 70 weight), but I decided to try it in a much larger multicolored thread, and make it into a picture frame.


Border/Frame
Unfortunately, at this point, I have run out of thread.  And, of course, this was all of this weight and color pattern of thread that I had. So now the question is, what can I make this into?

I'm thinking the best option will be a different shaped frame, something like this.


Curve the two long sides into an arc, and join the short side to make a base.

Any other ideas come to anybody's mind?

Larry