Sunday, March 30, 2014

I finished A-12, Framed Fancy, and A-13, Starlight Starbright, to complete Dear Jane Row A!!

I finished Framed Fancy and Starlight Starbright, this week.  Framed Fancy was a nice exercise in straight-forward paper-piecing. 


The block is rather muted to my taste, but I want my Dear Jane to have a nice variety of values to add interest to the trip around the world format.  At least, that's what I keep telling myself! 

The next block, Starlight, Starbright, is much more to my taste color-wise.  I first paper-pieced the inner 9-patch and the four outer edge units.  I then hand-pieced (not appliqued) the outer edges to the 9-patch center.  


I'm not an experienced hand-piecer.  You can easily see some of my white hand-stitches, but it will have to do.  I'm MUCH LESS PLEASED that I forgot to add the extra 1/4 inch to the outer edges and it finished small!  Wouldn't you know?  The last block in the row and it's the first one that finished small. grrrr


As I said in the previous post, I've really gotten hooked on Bonnie Hunter's quilt cam!  It's such an enjoyable, productive way to sew.  I love sewing in company, but it's not usually my most productive time, plus I'm not using my favorite machine in its most comfortable setup.  Quilt cam will never take the place of my real-world sewing buddies, but it sure is good company for, say, endless paper-piecing. 


Bonnie kept referring to "Leaders & Enders" projects during Quilt Cam.  After I figured out what she was talking about, I realized I already had the perfect project to replace my "thread bunnies".  I'm trying to use up a bunch of awful, dark fabrics donated to the Blanketeers years ago, which everyone else passed on, that I inherited.  Last year, I cut them into usable squares per Bonnie's system.  I matched each dark with a coordinating bright and made up many HSTs.  Now I'm keeping them beside my machine, waiting to take their turn after every paper-pieced chain.


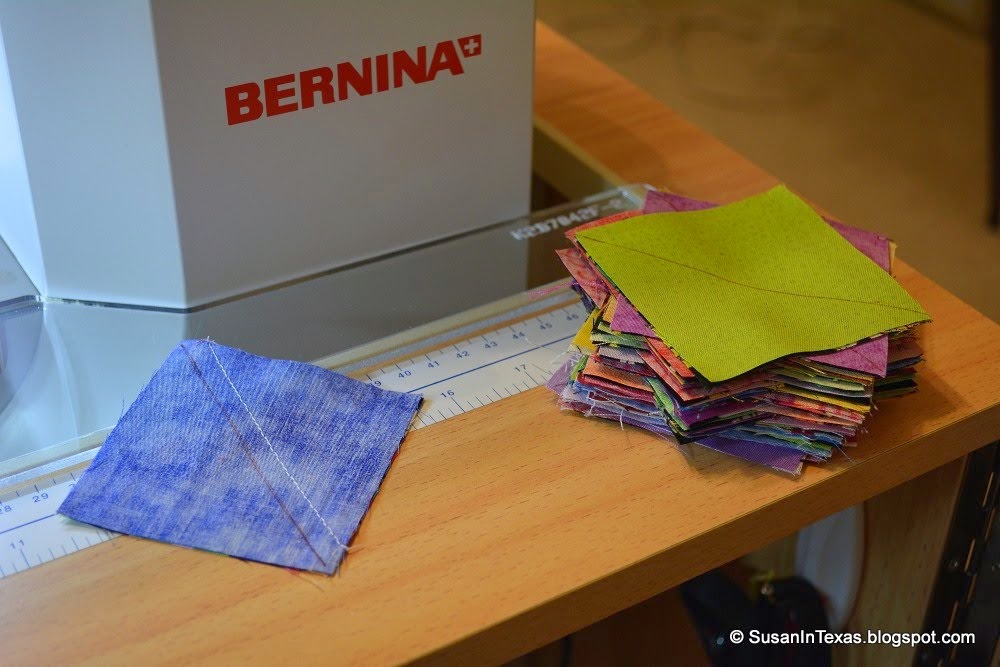
I have many HSTs done, but I need lots more; this is the perfect Leaders & Enders project.  So far, it's working like a charm.  I need over 600 HSTs for this quilt; if I waited until I had the chance to work on just this project, it would never happen!

Saturday, March 22, 2014

Paper Piecing A-11 Pebble's Protest, a Dear Jane Tutorial

I encourage everyone to try paper-piecing, but don't start with this block!  lol  It's not a true paper-pieced block, because near the end of construction there are four inset seams that have to be "dealt with".  

One of the reasons I enjoy paper-piecing now is that I no longer try to use the absolute smallest bits of fabric that will cover the pattern. Nothing is more frustrating than sewing a line, then having the fabric not cover like it is supposed to.  Also, a little prep-work makes the whole process go smoothly.  

To prepare, I measure the widest part of each shape, then add .5" for both seam allowances and another .5" for slop.  If the piece is on the outer edge, it gets another .25" for block "shrinkage".  I describe how I cut the fabric here.

To save time, I chain stitch units whenever possible.  For these tiny blocks I don't bother with using starch.  And since my fabric is plenty big, I don't mess with pins either; actually, I think pins just distort blocks this small.

These blocks are ready to be trimmed.  I like to do them factory style.  It's all too easy to forget to trim, and after you've sewn the next seam, well, then it's just too late.

Here they are, all trimmed.  There is a small amount of waste from using slightly over-sized pieces of fabric, but it makes life so much easier! 

These squares don't look like they need much trimming at all.

This Dear Jane block had lots of very tiny units. 

I think really good pressing is the most neglected step in quilting.  I see it all the time, but I'm not the quilt police, so I don't say anything. On tiny blocks like these, though, you really have to make pressing a priority.

After "melding" the stitching, I finger press the seams.  I use a small white press cloth to avoid getting the blocks grubby, and really spread those seams wide open.

The same cloth does double duty with my Clover iron.  I've scorched muslin with the Clover on high, so I set it to medium and use a press cloth.  So far, this has kept my blocks "scorch-free" despite heavy pressing.

Here are the center units, all firmly pressed and awaiting either a trim or their next attachment.

All the center unit sewing is done, now to join the inner units.  With Dear Jane blocks, it's always good to have the original pattern nearby for consultation.  These bits go together pretty easily, though dealing with units of one piece (and therefore, NO seams) is a bit tricky.  Another good reason not to make this block your first paper-pieced project.  lol

I found the idea of sewing inset seams daunting. I had never done any inset sewing at all before. I turned on a Bonnie Hunter web cam while I tackled them, and they turned out fine.  Just one more inset block to go!

And done! 

All that was left was to "log cabin" the outer white "logs," and trim it to size.  Thirty-three pieces in a 5.5" square and it's not even the most complicated block in row A.  That Jane Stickle had a real sense of humor.

Here it is, all done.  This makes two very tricky blocks in a row.  I'm glad A-12 is plain old simple paper-piecing.

Friday, March 14, 2014

Which Points West? Finished is Better than Perfect!

I'm glad this one is done!  A-10, "Which Points West?" was a puzzler to me.  I studied the published hints on this one and they did not appeal to me at all.  I just couldn't see myself piecing this block.


The points are so sharp they're practically begging to be reverse appliqued, but there's a problem with that since I hate doing reverse applique!  Now, it's been years since my last attempt, so I decided to give it a try with the melon.  This way I could see if it was as bad as I remembered.  At the very worst it would keep the muslin intact for the whole block, and prevent any shadows from having white over purple.  

It was awful.  It wasn't fun and it wasn't pretty.  No way was I going to do that four more times.  One melon of reverse applique was more than enough.  Back to my favorite:  prepared applique. OK, so the points ended up being more like nubs, and I managed to lose all the curvature that is supposed to be at the base of the triangles.  In fact, each point is wonky in its own "special" way, but it's finished. And finished is better than perfect!

Once again I think I've talked myself out of ever making one of those gorgeous Hawaiian quilts.

Tuesday, March 4, 2014

If I'm not careful, I'll finish Row A of Dear Jane

Three more Dear Jane blocks are complete.  The first two, "Dad's Plaids" and "Florence Nightingale" were pretty simple, not very many pieces and not too hard.  I ironed the melons around a plastic template for "Dad's Plaids", which gave much more accuracy than freezer paper.


I still have to cut the brown fabric out from behind the white applique to make the white melons less dark.  

"Florence Nightingale" came out nice and crisp, even though I'm not using any starch for the paper-piecing.  I had always used starch before, and I never liked how crunchy the blocks would get.  I wanted this Dear Jane to be soft throughout the process.


At 45 pieces, the third block this week, "Cabin Fever", took lots more planning.  I only enjoy paper piecing if the pre-cut pieces easily cover the paper being pieced; also, this way I can avoid using pins during the paper-pieced part of the process.  (Typically I want the pre-cut rectangle to be 1/2" larger than necessary in both directions.)  I also really hate using pre-cut triangles; I would much rather cover a triangular shape with an over-sized rectangle.

To avoid wasting fabric, I decided how big each rectangular paper-pieced pre-cut needs to be, then cut strips of fabric as wide as one side of the rectangle.  I then labeled the width of the strip in the selvage with permanent marker, then I pre-cut all my rectangles.


Having all the correctly sized pre-cuts ready and waiting made "Cabin Fever" come together quickly and accurately.  Having a six inch cutting mat and my little Clover craft ironing station set up next to the sewing machine helped hurry things along too.  I'm using a press cloth for all pressing (even finger pressing) to keep the blocks nice and clean.


Just because I don't pin during the paper-piecing process doesn't mean I don't pin obsessively when putting the sections together.  I use two pins around a removable guide pin at every seam intersection, as well as pins at each end of the section.  I think I had ten pins in the longer side sections.