Thursday, April 30, 2015

Nearly Wordless Wednesday - Siggy from Denise Huber of Mondercange, Luxembourg

This lovely siggy arrived from Denise Huber of Mondercange, Luxembourg while we were on vacation.  I love the design and the retro-modern circle fabric.


I need to get a return siggy in the mail to Denise right away; fortunately, I have a few already made up.

Wednesday, April 29, 2015

Tatting Tuesday (on Wednesday)

Going on vacation can certainly throw off your routine! So this week Tatting Tuesday will take place Wednesday.


Heart Bookmark

Previously, I had posted about a bookmark project where I needed to correct mistakes. First I needed to correct a missed ring on the third heart.  Then I needed to make more hearts to complete the bookmark.


The Parts of the Solution

Finally, I needed to work in the ends of the separate pieces, and trim off the excess. 


Now I need to work arcs over the tops of each heart, and this bookmark will be finished.

More soon,

Larry

Tuesday, April 28, 2015

Dear Jane E-2, Merry May Complete

Merry May is the last of the vacation applique blocks, though I actually finished it at home last night while catching up on Game of Thrones.  I like the simplicity of this block, plus it is an excellent showcase for an interesting batik.  I only wanted touches of the dark tones to show to add interest to the block.  There is actually a large blob of dark red hidden below the upper melon; you can see it barely peeking out on one side.


I have made this block before.  I am not sure what I was thinking in 2008 with my wild and crazy color choices.  I think using the white muslin against the batiks is a much more livable solution.

Monday, April 27, 2015

Dear Jane C-2, Streak of Lightning Completed

I think this might be my favorite block; it was certainly fun to work on.  I did have to alternate applique thread colors, but it was very easy to fill in the white spaces after all the purple was done.


We got back to Texas to a night of stormy weather, especially to the south of us here in Fort Worth.  Vacation in Scottsdale was awesome - lots of quilt stores and hiking and perfect weather.  I will have some pictures later this week.

Saturday, April 25, 2015

New Hobby for Larry - Crochet!

When I started tatting as a hobby, Susan told me I could do many of the same things with crochet, and that crochet would be easier and lots more forgiving than tatting.  So, with that in mind, I have decided to give crochet a try and see how I like it.  

To start with, I needed some tools and materials...

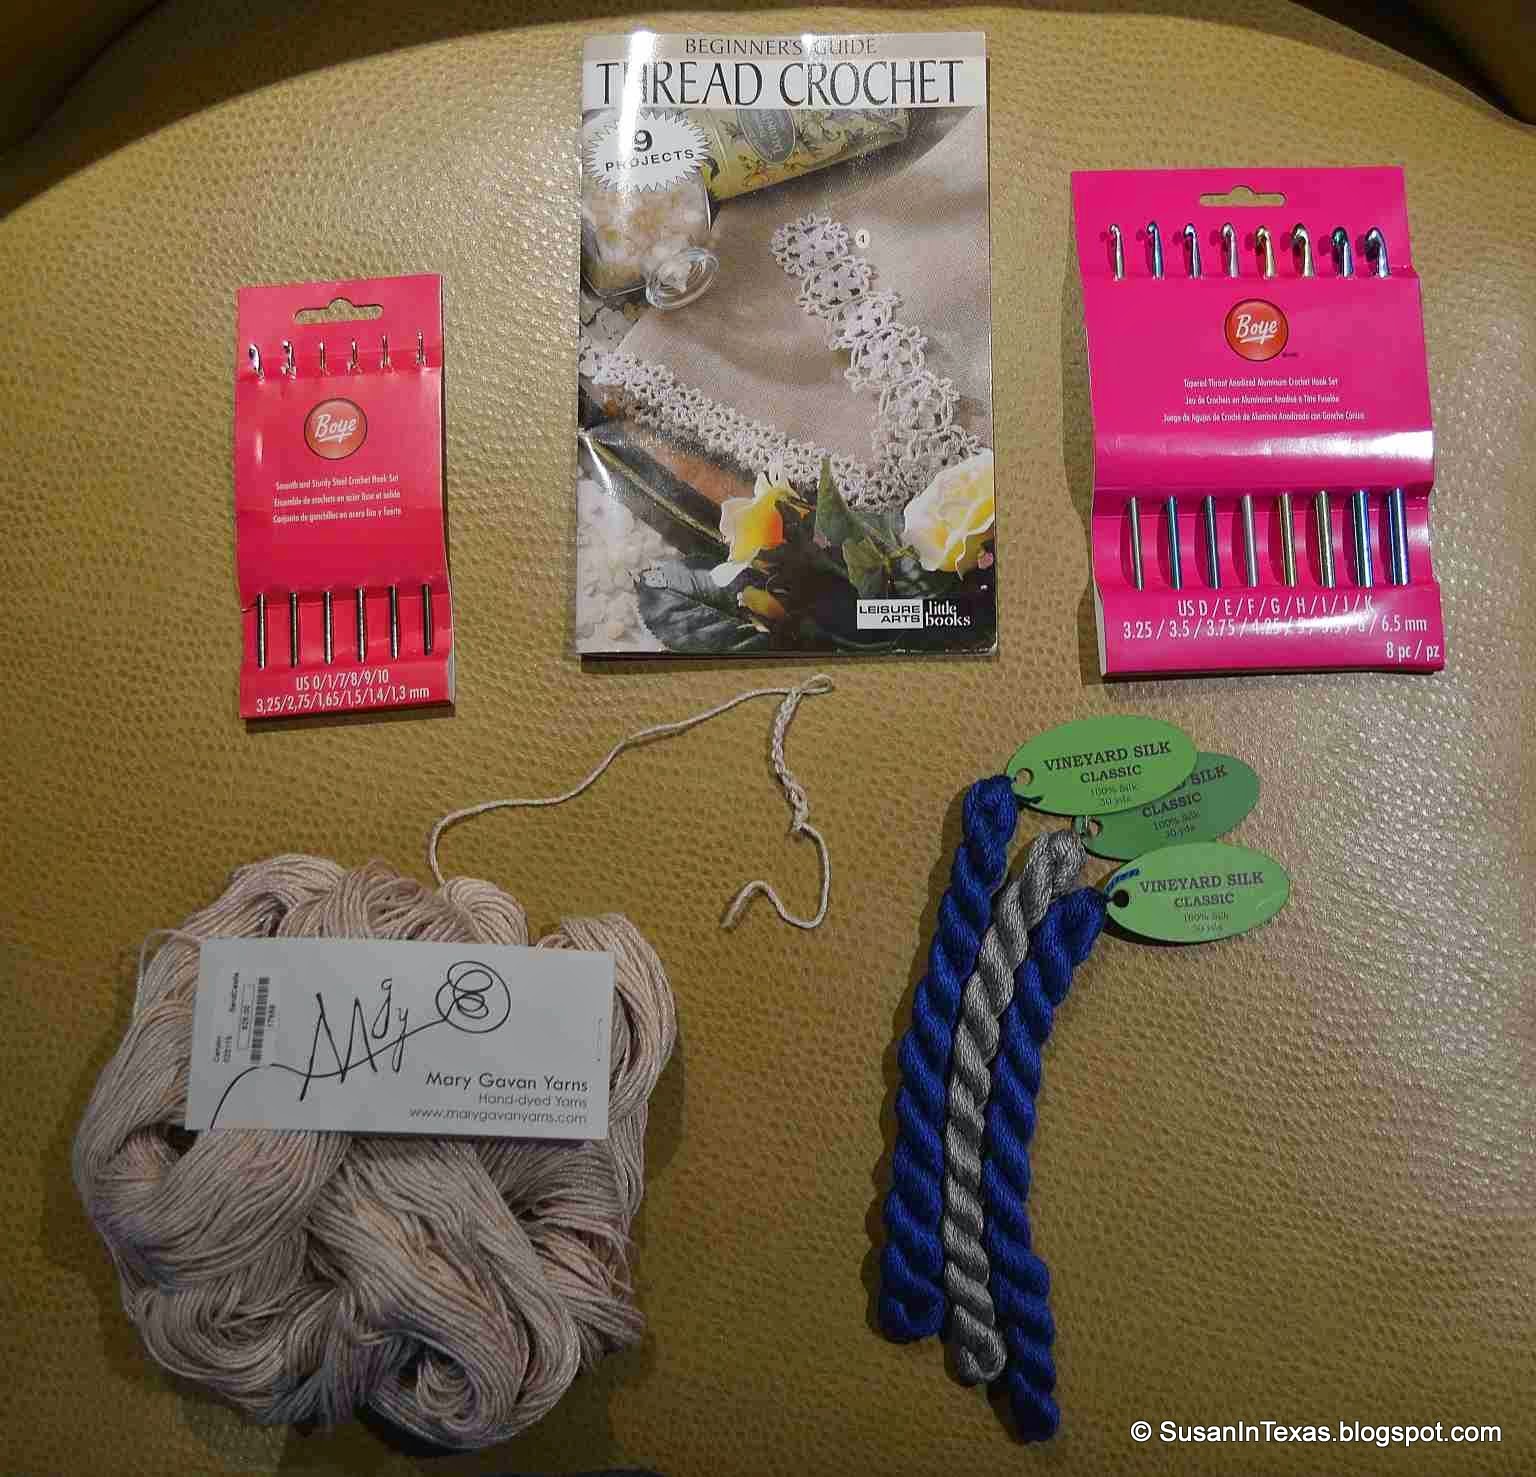
Crochet tools and materials

Some crochet hooks of my very own (I am sure this will help keep Susan's hooks from going missing). Some lovely fibers to work with (I am not sure I am worthy of them yet - that blue stuff is silk!) And a booklet on beginning crochet techniques and patterns.  

You can see, in the middle of the picture, I have managed to do a short section of chain stitch.  I will be posting my triumphs and tragedies in this new arena as they occur, perhaps on a new day of the week.  I am not giving up tatting at all; I just want to try something where mistakes are easier to correct for a change.  

More to come!

Larry

Friday, April 24, 2015

FriXion Erasable Gel Pen Freezer Test

FriXion erasable gel pens are designed to completely erase with the heat of ironing, never to reappear; however, internet rumors abound that the ink reappears if the fabric gets cold enough.  After receiving a set of these pens at the last Christmas bee, I promised my fellow quilters that I would put them to the test.

I wrote the name of each color:  black, purple, pink, orange, brown, blue, and red upon a piece of plain white muslin.  No problems there, the pens were terrific at marking.  

I immediately ironed the muslin and all the marks (and I mean everything) completely disappeared as advertised.  Now I just had a scrap of white muslin, identical to every other scrap of white muslin in my sewing room, so I thought I had better mark it or it would end up in my Dear Jane by accident.  I wrote "test piece" on it with a Pigma Pen, because marks from those pens are forever.

The scrap of muslin then got washed in the washing machine with warm water, then put in the freezer for a few weeks.  Here is the result:

This is a fairly accurate picture.  All the colors came back at about 5-20% of their original intensity.  Pink did the best, you can barely make out the 'K' in "PINK" above "ORANGE".  

Now, most people would say, "Well, I am never going to put my quilts in the freezer!" and they are right, of course.  But my family, like thousands of others up in Wisconsin, have a cottage on a lake out in the middle of the north woods.  A cottage which remains unheated for most of the winter, a very cold cottage! Christmas presents kept in car trunks in Green Bay can get bitterly cold too. (No one runs out of freezer space over the holidays when you can say things like "Get the ham out of the Buick.")

I like FriXion pens; in fact, I like them a lot, but I would not use them on the top of my Dear Jane, or on any quilt I ever plan to send to the great white north.  Something to consider.

Happy quilting,
Susan in Texas

Thursday, April 23, 2015

Dear Jane B-12 Starflower Complete

This one will not win any prizes for perfect placement, but I think it turned out very pretty and will make a very happy splash on my Dear Jane.  In any event, I am glad to have it finally done.  It reminds me of the sewing labels my sister bought me for Christmas which say "This took forever!"


B-12 Starflower
I believe this completes the last little remaining bit of Row B.  I believe I am closing in on 40 completed blocks; that is almost a quarter of the blocks completed.  Wow!

Wednesday, April 22, 2015

Not Nearly Wordless Wednesday - Dear Jane B-12 Starflower Progress

One melon down, three to go.  That center "square" really gave me problems; the wonky corner has already been redone once.  For some reason, I was careful with the direction of the overflowing fabric for the melons, but not with the center; it really makes a difference.  Another lesson learned:  All excess fabric must flow to the left.

B-12 Starflower
Still loving this batik though; it was a treat to work on it again

Happy quilting!
Susan

Tuesday, April 21, 2015

Tatting Tuesday - Hearts Bookmark Progress

My latest project is a bookmark consisting of a string of hearts.  I am working it in 20 weight thread, a bit smaller than my last project.  I do, however, have a big ball of this thread, so I shouldn't have to worry about running out!

Hearts Bookmark
I will have to figure out how to correct my error on the third heart, where you can see I missed the little ring that drops down from the heart.  I think I can make a separate ring, and attach it later. But I'm sure it would have been easier to do it right the first time!

Larry

Monday, April 20, 2015

Dear Jane - Finishing B-11, Melissa's Cross

I finally finished B-11, Melissa's Cross.  How I love appliqueing circles; no pesky points to irritate me.  I did have to swap out purple and white thread for the applique every time the fabric changed.  I did all the purple, carrying the purple thread behind the white bars, then went back for the four separate white sections.


I think B-11 is one of my favorite blocks.  I love the fabric.  I wish I had more scraps of that batik, but I used up the whole piece on this block.

I am back to using freezer paper for my applique.  I always wonder if I am doing my applique the "right" way.  I have read several sets of instructions on the subject, and their stitches always look so perfect.  My stitches never look perfect.  I usually have to be happy if my stitches do not show and the fabric ends up tightly attached to the ground.  If my curves are smooth, well, that is just a bonus.  lol 


Does anyone besides me wonder if their work is "good" enough?  I might want to show my Dear Jane when it is done, perhaps I will find out then that I am doing "toe-catching" applique.  I knew when I entered "Ethan" in my first show that the quilting was bad because I had problems with bobbin tension, but I never knew the stitches on the binding were supposed to be SO close together.  Live and learn. 


Happy quilting!
Susan in Texas

Saturday, April 18, 2015

Singer Restoration Saturday - Model 127 Lessons Learned

Lessons Learned from my first sewing machine restoration.


(1) Know what's next.  It seems like at every step, I would finish it, and only then take thought for the next one. So I would have to wait for equipment or materials to be ordered and shipped, and then I could work on the next step.  I'm sure that's a small part of the reason why it took so very long to make any progress on this refurbishment.

(2) Keep related things together. As I acquired new machines, I put them in a tray labelled with the serial number of the machine. As I removed parts, I put them in plastic zipper bags, usually with a note identifying what the contents were, and put the bags in the appropriate tray. This helped a lot when trying to find the screw that was needed to hold a part on.

(3) Know when to stop digging.  When I got to the disassembly step that involved removing the Taper Pin holding in the Arm Shaft, I tried and tried to whack it loose, but it would not budge.  Finally, I realized that I really didn't have to remove the Arm Shaft; I could simply mask over the few exposed parts and it wouldn't be in the way for painting. In fact, there was very little else that I could remove at that point that would not be easier to cover for painting rather than removing.

(4) Paint everything at the same time.  When I started painting the main chassis, I had neglected to prepare the balance wheel and the parts of the bobbin winder assembly that needed painting.  After completing the rest of the machine, I had to go back and re-paint these parts, instead of being done with painting.

(5) Know what not to paint. When putting back the slide plates, I discovered that my lovely paint job had filled in grooves that the plates slid into.  In order to get them in place, I had to dig the paint out of the grooves, and when I did that I damaged the paint on the bed nearby.  I could have saved a lot of time and headache by masking off that area from the start.

(6) Don't be afraid to fail.  You can spend much more time not doing something than doing it, failing, and learning how not to do it wrong again.  And you may learn something else useful when you fix what you did wrong.

Friday, April 17, 2015

Dear Jane E-2 Merry May - More Progress

I just loved working on this block.  It was so interesting to see how the patterns would come out.  This batik has large blobs of the dark red tones, but I fussy cut around 90% of them.  I think the little bit I left in adds spice to the block.

Dear Jane E-2
There is a bit of the red near the center of the lower applique piece; I hope some of it peeks through when the second melon is sewn on top.  Speaking of which, is it slack of me that I am planning that my applique stitches will be substantially further apart where they are not going to show?  I think that is just good judgement, don't you?  lol

Happy quilting!
Susan in Texas

Thursday, April 16, 2015

Dear Jane D-2, Mouse in the Mirror

Inset seams are finally starting to get easier.  I just pinned and sewed more, and fussed and fretted less, and soon "Mouse" was complete.  I thought it would be more difficult than Tinker Toy, but it was actually easier.  Paper-piecing certainly makes it much more straight-forward.  I am now much less worried about completing the harlequin blocks of my Harlequin-Johnny.


D-2  Mouse in the Mirror

I really like how the fussy cutting on this block turned out.  I think the little spirals add lots of visual interest.  One of the things I love about batiks is that you can often change the whole look of the fabric with judicious planning and careful cutting.  I will be reusing many fabrics in my Dear Jane, so I am planning to take advantage of the fluid nature of my batiks.

Tuesday, April 14, 2015

Tatting Tuesday - Running out of Thread

For my latest tatting project, I was working on a border out of one of my Grandma's books (Orkis, by Nikolajsen and Nikolajsen). The pattern is for a handkerchief border (in 70 weight), but I decided to try it in a much larger multicolored thread, and make it into a picture frame.


Border/Frame
Unfortunately, at this point, I have run out of thread.  And, of course, this was all of this weight and color pattern of thread that I had. So now the question is, what can I make this into?

I'm thinking the best option will be a different shaped frame, something like this.


Curve the two long sides into an arc, and join the short side to make a base.

Any other ideas come to anybody's mind?

Larry

Monday, April 13, 2015

Weekend with Grandma in Blooming Shreveport

I did not get much quilting done over the weekend, we visited with Grandma in Shreveport instead.  She was a little gloomy when we arrived.  They had put up a construction wall that covered up the windows she loved near the dining room in her assisted living facility.  Bless her heart, she thought it was going to be permanent. We got the full story and set her straight.  It is just a two month project to enlarge the activity room.  Oh happy day!  lol


To make up for the ugly construction wall, we showed Grandma pictures of the azaleas blooming at the old house.


We managed to visit while they are near their peak, and they are pretty spectacular.


It was such a mild day that we took Grandma for a short spin outside, and sat for a spell in the gazebo.  She lives in a lovely, park-like setting, with manicured gardens and a beautiful small lake, but Grandma rarely wants to go outside.  She is more of an indoor girl.

What a kidder.  Doesn't she look terrific for 103?  We should all be so fortunate.


We had a very nice visit!


Happy quilting!

Saturday, April 11, 2015

Singer Restoration Saturday - Model 127 #2

As Susan mentioned in yesterday's post, I have been working on refurbishing a second Model 127, this time with a white pearl paint job.  It really is beginning to look pretty!

Model 127 #2
Of course, it started out looking very sad -- rusted and missing parts.
Only one slide plate
No back cover plate
And full of lint
Also, it was so thoroughly stuck that I had to soak it in kerosene for a couple of weeks before I could get the main shaft to turn.  But once I got the insides freed up, I started working on the paint job.

Stripped to the bare metal
You can see in the picture below the result of one of my lessons learned from the first restoration I did.  I painted the bed slots where the slide and foot plates go, not realizing that they would no longer fit with paint in the grooves where they go in.   And in digging the paint out of those grooves, I damaged the paint on the bed nearby.  Below you can see the cardboard shield I constructed to keep the paint out of these areas.
Primed for beautification
And next the base coat.  We weren't entirely sure about this color by itself.  It seemed awfully....white.
Base coat white
But when I added the pearl mid-coat, it really added a beautiful golden sheen to the white.
Pearl mid-coat on arm

Pearl mid-coat on bed.

Next step will be to stencil in the details, and protect it all with clearcoat.  

Larry


Friday, April 10, 2015

Dear Jane C-2 Streak of Lightning

I got the applique for C-2, Streak of Lightning, basted just this morning.  This block makes three prepared "vacation" appliques.  I think I will continue with D-2, Mouse in a Mirror, which is paper-piecing combined with inset seams, and E-2, Merry May, which is applique on a simple  paper-pieced ground.  (Note to self: you are NOT afraid of inset seams, you're not, you're not, you're not!)


After E-2 I will definitely start working on clue 4 of Grand Illusion
  
By the way, Larry has started working on the second Singer 127 restoration.   This one is going to be pearl white, and the paint job already looks AWESOME!  I have to start working on creating some stencils; we going the airbrush route instead of decals this time.

Thursday, April 9, 2015

Spring is blooming at the Botanic Gardens and a Start on Dear Jane C2 - Streak of Lightning

We had fun on Easter at the Fort Worth Botanical Garden, even though the rain threatened us the entire time we were there.  Here is my dear husband, Larry, tatter extraordinaire, and resurrecter of Singers, peeking through a beautiful blossoming cherry.  We are so lucky to have such a wonderful (and free!) place to enjoy nature right in the heart of Fort Worth.


I got started on my Dear Jane block, C2-Streak of Lightning, though only the center section is completed.  Instead of having four inset seams, I think I will just applique the center to a single piece of muslin, then applique the purple diamonds to the muslin.  Easy peasy, and more handwork to take along on vacation.


It still has the papers on, so it will barely stick to my design wall, and every edge insists on curling, but this part of the block actually turned out really well.  I had to fussy cut the purple like mad to eliminate the crazy wild pink in this batik.  You can see a hint of the pink in the lower diamond.  You just never really know how a lively batik like this will make up in a block.

Wednesday, April 8, 2015

Dear Jane B13 - Four Corner Press

I asked for fabric for Christmas and my niece, Kate, knocked it out of the park.  She gave me a gorgeous selection of fabrics, including the batik centerpiece on this Dear Jane B-13, Four Corner Press.  It is very different from all my other batiks - almost an indigo.  

B-13 differs from all other DJ blocks in that it replaces muslin with another fabric.  I wanted to keep the muslin stand-in very light, with high contrast to the focal fabric. When I saw these two fabrics together I knew I had my Four Corner Press.

Dear Jane B-13 - Four Corner Press
I could not resist fussy cutting the batik to showcase a single flower, but I let the four corners fall where they may.  The light blue is a hand-dyed from Joy's Fabric.  Her hand-dyed pastels have a wonderful texture - very soft and rich.  We run into Joy at virtually every quilt show we attend, and I never make it past her booth without making a purchase; her selection of fabric is top notch.

Is it not great every once in awhile to come across a super-simple Dear Jane block?  I think Four Corner Press certainly fits that description.

Well, who woulda thunk it?  Row B is complete.  Saaaalute!

Happy stitching,
Susan in Texas

Tuesday, April 7, 2015

Tatting Tuesday - Sewing Machine Spool Doily

This is a little project I made up in an attempt to create more vintage-style accents for the refurbished sewing machines I have been working on.
Tatting Project #5 - Spool Doily
This little doily fits over the spool pin of the sewing machine, and gives the spool of thread something to rest on. Or, if there is no spool, it provides a quaint little decoration for the top of the machine.


I basically started this with the beginning of a snowflake pattern, making sure that the central hole was the right size to fit snugly on the spool pin. Then it was just a question of making enough rings around the first one, until it was big enough to peek out from under a spool of thread.

Larry


Monday, April 6, 2015

Finally Back to Dear Jane - Prepping B-11 Melissa's Cross and B-12 Starflower

I want to have some handwork to take on an upcoming vacation, so prepping the applique is as far as these two blocks will go for now. I paper-pieced the center section of Melissa's Cross, then attached the purple half moons.  It was freezer paper time after that.  

With guidelines drawn on the freezer paper circle to insure proper alignment, I pressed and basted the seam allowance.  The whole thing then got basted to an over-sized piece of muslin.  It will get cut to size after the applique is done.  My handwork has a tendency to draw up the ground fabric quite a bit so I like to leave some extra.

I almost did not have enough fabric to complete this block.  I used a scrap from my recent bargain bin bash in Green Bay, and it was just enough, with barely a crumb left over.  I love this batik!


I was careful this time to make all the melon tips point left on Starflower, so I can applique to the point before having to sweep under the excess fabric.  I was also super careful with placement to avoid having one wonky melon again.  We will just have to see if all my concerned fiddling makes any difference in the final outcome; it is really hard to tell with all the excess at the points in the way right now.


We went to the Botanic Garden yesterday where the wisteria are in full bloom.  The rain held off while we were there.  It was a bit early for the roses, but everything else was really starting to pop.


Saturday, April 4, 2015

Singer Restoration Saturday - Wiring

One of the parts of motorized vintage sewing machines that seems to suffer most is the wiring. The insulation is usually dry and crackled, and often the wires have been cut through.  
Foot controller, plug for electric socket, plug for machine.  And a mess of old wires

In this case, I recommend taking it all out and replacing it with modern wiring.  Be careful to note which wire goes to which connection.

You will need two pieces of wire: one about six feet long that runs from the wall plug to the sewing machine plug, and another about four feet long that runs from the foot controller to the sewing machine plug.  Cut the wires near the wall plug, open up the plug, and replace them with the new wire.

Turn over the foot controller case and remove the screws in each of the four feet underneath. Turn it upright and disconnect the two wires there. Replace them with the new wire.
Foot controller underside

Foot Controller disassembled
 Remove the two screws in the sewing machine plug. 

 Lift the three connectors from their slots. Again remembering which wire goes where, cut the wires and pull the old wire out of the plug, and remove the old wires from the connectors.
Sewing machine plug - connectors and old wires
String the ends of the new wires into the plug, and connect them to the connectors. You do remember which wire goes where, don't you?
Sewing Machine plug - connectors and new wires

At this point, you need to put the connectors back in their slots and screw the sewing machine plug back together.  This is a very tight fit, and you may need to adjust the wire-to-connector attachment in order to get it to come together properly.  But, once done, you can plug in your sewing machine, step on the foot controller, and you are in business again!

Larry