Friday, April 3, 2015

Harlequin Johnny - Paper Piecing Complete

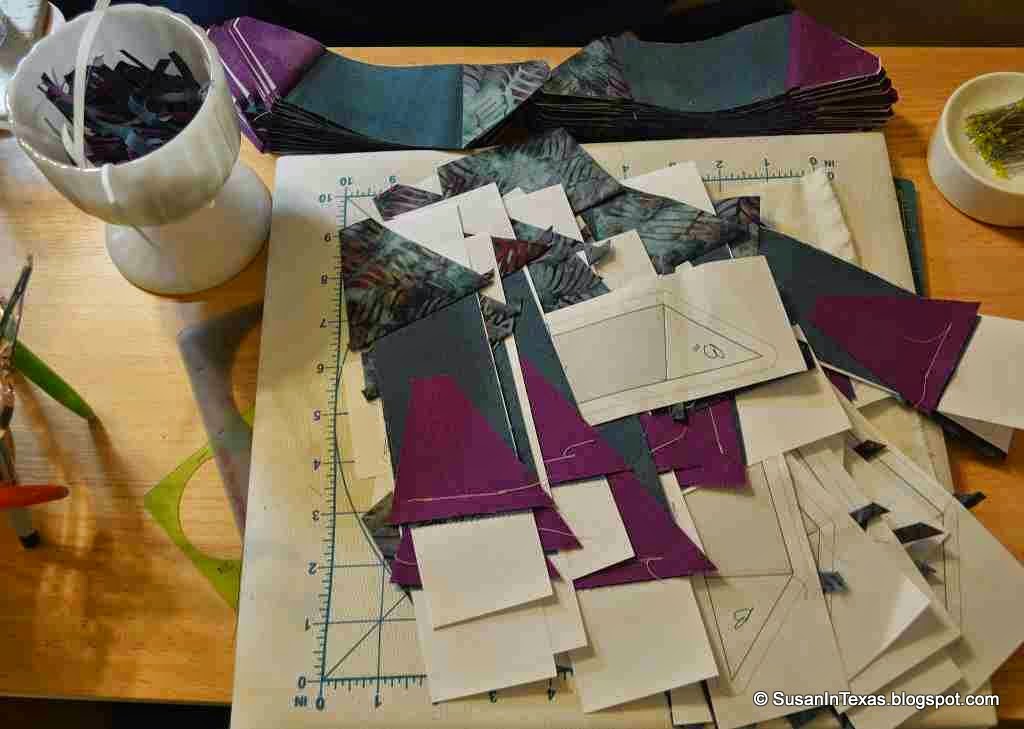
I completed the 100 harlequin units last night.  I love how they look next to the corner units.  It is hard to believe it went from such a big mess to neat stacks of tidy little units.  I do love paper piecing!  

The only problem is, after I had completed about half the units, I realized I had forgotten to "mirror" the unit, and the purple ended up on the right side instead of the left.  Sigh.  If I had a dollar for every time I forgot to mirror a unit, I could go out and buy one of those gorgeous, but pricey, "Be Colorful" quilt patterns.  Larry says I am being silly, and that it looks the same either way, but I liked it better the other way.  Oh well, too late now.


Here is the giant milk glass goblet I was talking about yesterday.  I use it to hold my crumbs.  You can see the handle of my scrap basket peeking up past my Koala - that holds the larger scraps.


The goblet is only supposed to be a temporary crumb stop, but the tupperware container I use to store my crumb collection is really full.  I looked for a small basket at the Dallas Quilt Celebration, but I could not find the right size.  I will have to empty is soon; it is starting to overflow.


I do enjoy reviewing the archeology of my crumb collection.  The yellow at the bottom is from my last Dear Jane block, all the green and black is from Grand Illusion and there is one bit of batik from Harlequin-Johnny on the very top, though it looks almost black in this picture.  I do love using Grandma's milk glass.

Happy quilting everyone!
Susan in Texas

Thursday, April 2, 2015

In the thick of things with Harlequin Johnny

I am right in the middle of paper-piecing 100 units for my Harlequin-Johnny quilt.  I have two neat little stacks of 25 completed units and a messy pile of 40 fully sewn units waiting to be trimmed. 


The remaining ten units are tucked beneath my heavy set of Webster's Third Edition getting nice and flat after being ironed. This is a trick I learned from Sally Collins in her Precision Piecing video.  Whenever I have fabrics that resist being ironed, you know, the kind that thinks it needs to go right back to its original shape no matter how hard you press?   I place it, still hot, under my trusty Webster's and let it cool under there.  Webster's is very convincing!


I am please with the template sizes I used for both fabrics.  You can see I do not have too much waste.   I would call what is left over bigger than slivers, but much smaller than crumbs. (Goodness, my hands are dry!)  Do you recognize the Dear Jane triangle ruler?  It has the best quarter inch line of any of my rulers, and I use it often for trimming paper-pieced units.


You can see the white vintage Avon goblet I use for small fabric trimmings.  This was a piece from my Grandma Ann's milk glass collection.  I will have to take a picture of her much larger milk glass goblet, currently in use holding crumbs.  It is just out of frame here, and is over-flowing with crumbs from Grand Illusion.  I love repurposing vintage glassware so I can enjoy it every day.


Enjoy the process!
Susan

Wednesday, April 1, 2015

Nearly Wordless Wednesday - Vintage Handkerchiefs

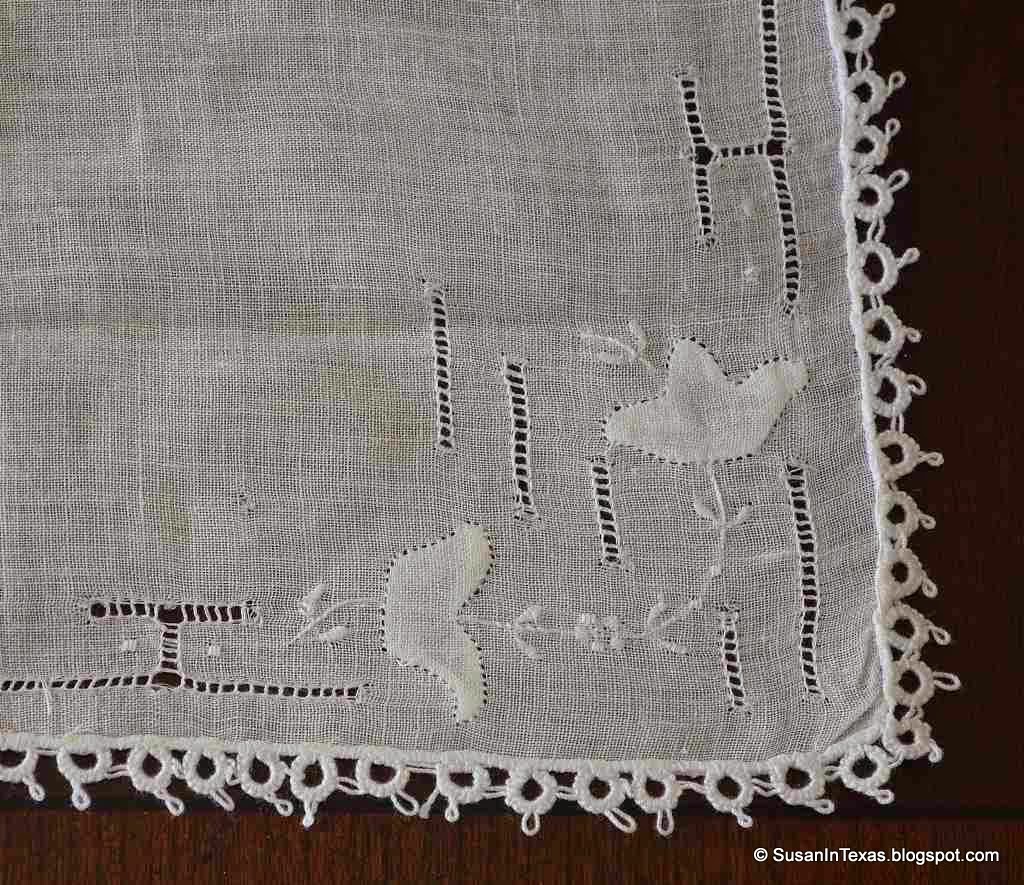
We found many treasures while cleaning out my father-in-law's house, including these two lovely handkerchiefs.
  
lawn handkerchief

It is likely that my late mother-in-law crocheted the edges of both handkerchiefs; she was very gifted and craftsy. The square one above is made of a very fine lawn, and has an interesting, asymmetric embroidery motif.  The one below is of patterned, tone on tone silk. 

silk handkerchief

I have never seen silk with such a subtle pattern before.

pattern in silk

Both handkerchiefs are in really excellent condition; I am very fortunate to have them in my collection.

Tuesday, March 31, 2015

Tatting Tuesday - Mystery Pattern

Susan has been working a mystery quilt for some time, and early this year I got the idea to look for a mystery tatting pattern.  To my surprise, I found one that was starting up almost immediately -- Jane Eborall's Tat It And See 2015 challenge.  The instructions said you would need number 20 thread in one or two colors (I chose gold and white - all I had in number 20 thread!) and a small four-hole button.

So the first "clues" came out, and I joined through one of the holes in the button, and then out a ways. Then I worked back, and joined to the button again. Then out, and back to the button again (at this point I thought it was going to be an octopus). 

Next I was instructed to work around the button, and away again, but this time there was a circle of split rings at then end of the arm before working back to the button. One more arm, another circle of split rings, and back to the button and around to finish where you began.

The final result?
Tatting Project #4 - Mystery Pattern
This project introduced me to working a button into the tatting, and the technique of split rings.  I found the split rings very strange -- tatting "forward" halfway around the ring in the usual fashion, then "backward" halfway around the ring with the other thread in the opposite direction.  All those frustrating knots learning to make the knots the right way, and then you're supposed to do it completely wrong again!

Larry

Monday, March 30, 2015

Harlequin Johnnie - Making of the Harlequins with Templates

After finishing Clue 3 on Grand Illusion and prepping bunches of Half Square Triangles for  the HST quilt, I am back to working at paper-piecing the "Harlequin" blocks of the Harlequin-Johnny quilt.  I am in the middle of completing the 100 units that make the "Harlequin" an actual harlequin in my mind, that is, the small purple and batik triangles.


I was concerned I would get the colors of the harlequin triangles mixed up, so I labeled the papers with a big "B" on the batik side before Larry took them to Kinkos.  This pattern will not work if all the batiks are not on the same side.  It was a big help, so far I have not had to unpick any of the pieces I have completed so far. 
  

Paper-piecing was the only way to go on the harlequin blocks, because the angles of the triangles and trapezoids are very strange.  The Johnny blocks were definitely easier to make.


I love paper-piecing as long as the fabric is easily large enough to cover the pattern when it is flipped back.  If the fabric is too small it becomes too hard to do, which takes all the fun out of the process.  On the other hand, I do not like to waste fabric, especially since I have just designed the setting triangles for this quilt, and I am going to need all the leftover fabric I can lay my hands on!

To find a happy medium I used slightly over-sized templates to cut out the fabric.  Determining the proper sizes of the templates is a two step process. 


The first piece "set" in the paper-piecing process is laid right over its pattern on the paper.  This template does not need to be much larger than the actual pattern.  I usually make its template 1/4" longer and wider than the pattern, as if it has 3/8" seam allowances instead of 1/4" all around.  This allows for a little bit of slippage and is not very wasteful at all.  


Triangles are trickier to paper-piece so I cut them more slack... literally.  I made the template for triangular pieces as if they have 1/2" seam allowances instead of 1/4".  This is usually large enough to easily cover the pattern even if my placement is a little wonky.


Instead of tediously marking the fabric, I cut strips from selvage to selvage the same width as the template from the snub nose to the opposite side, then used the template to place the ruler to rotary cut the fabric.  If you flip the template top to bottom after each cut the angles nest nicely, and there is no waste between the cuts.  This technique worked REALLY well.  I could rotary cut 4-5 strips at once.  I will definitely do it again, it was much less work than marking the fabric!  

The only thing I had to be very careful of when cutting the purple grunge fabric was keeping the orientation correct, otherwise the wrong side of the fabric would end up face up.  To do this I put "Grunge up" on the template itself, and made sure to cut the strips with both the template and the fabric right side up.


The batik, being fully reversible did not have this orientation issue.  Neither did the blue grunge trapezoid since it could be flipped on its axis and used in either direction.  I am about half done with these units, which will complete the paper-piecing on these blocks. The center of the block is just a single square of the batik.  Putting the harlequin blocks together with their four inset seams per block should be really fun.  **sarcasm**

Saturday, March 28, 2015

Singer Restoration Saturday - Airbrush Cleaning

Yesterday, I was trying to put one last black basecoat on the bobbin winder parts for the Model 127 #1, but the airbrush would not behave -- the airflow was weak and the paint kept spitting in too-large droplets.  So, once again, it is time to break it all down and give each part a thorough cleaning.

Airbrush in need of cleaning
A word of warning: Many of these parts are really small. Be careful to put them in a safe place while cleaning and do not drop them, or you may be ordering another replacement part. 

First of all, you need to unscrew the needle chuck between the holes in the back section, and remove the long needle that runs from the ball at the tail of the airbrush to the nozzle at the tip.

Needle Removed
Removing the needle releases the trigger from being held in place. Take it out by pulling it straight up (if it doesn't fall out all by itself). 
Trigger no longer locked in place

Comes out nice and easy
 With the trigger out, the trigger back lever should be pushed forward to the front of its track.  Gently push it back to the rear end of the track, the cross track should give you room to wiggle the lever free.
Trigger and Trigger Back Lever Removed
To loosen the air valve, use a 1.5mm Allen wrench to loosen the nut at the end.  This is the smallest Allen wrench in the set I have, and some sets do not go this small.

Ready to loosen Air Valve
Once loosened, unscrew the rest of the air valve from the body of the airbrush, using the grip in the middle.  You might need to use a small pliers, if finger strength is not enough to get it started.

Notice how really tiny the nut you first loosened is, and also, the spring from inside the assembly.  Imagine trying to find them if you drop them on the floor! Also inside the air valve are a tiny O-ring and valve plunger (not pictured).
Tiny Parts of the Air Valve
Next, unscrew the Spray Regulator, Spray Head, and Spray Tip from the airbrush body.

Spray Regulator, Spray Head, Spray Tip

Finally, unscrew the cutaway handle at the back of the airbrush, then unscrew the tube shank assembly found inside.

Cutaway Handle removed
Tube Shank Unscrewed
Finally, you are ready to begin cleaning.  Using the appropriate solvent for the paint you have been using, clean out the paint cup and front of the airbrush body. Use a Q-tip or small brush to get down into the bottom of the cup, and the channel, out to the spray assembly. Make sure the air valve plunger moves freely inside the air valve, then re-assemble the air valve, and make sure the plunger still presses in easily and quickly springs back.

Cleaning out the paint cup

Make sure that paint (middle) channel is clean, too
 Now to put everything back together:  screw the spray regulator, head, and tip together on the front of the airbrush; the air valve on the underside; and the tube shank assembly at the rear.

Coming back together
If the tube shank assembly will not screw in all the way, turn its center post while pulling gently, until the post lines up with its channel.  Then you should be able to screw in the tube shank assembly the rest of the way.

Pulling the tube shank assembly post when lined up properly
Pull back on the post again, and work the trigger back lever into the slot at the back of its track. To hold it in place, you can push it to one side while you insert the trigger.

Putting in the trigger back lever
Lever pushed to the side for now
 Put the trigger in the front end of the slot, ahead of the trigger back lever.  Note that the holes in the trigger must face the front and back of the airbrush (the needle will go through them soon). Note also that the tip of the trigger must rest on the point of the air valve plunger.  When properly placed, you should be able to press down on the trigger and feel the plunger move, and then release it and feel it spring back.
In goes the trigger
Finally, thread the needle through the needle chuck, then through the holes in the tube shank, trigger back lever and trigger, spray regulator and tip. When the needle is properly place, the point of the needle will show through the end of the spray tip, visible through the hole in the spray regulator. Tighten the needle chuck, screw on the cutaway handle, and you are ready to go!
Nearly done
Or so I thought.  Even with all this cleaning, my airbrush still would not work!  It seemed like there was not any air getting through, even though the air valve was working fine. Finally, I found the problem in the spray regulator. 

The culprit
It does not show up very well on this picture, but I found a ring of dried paint around the inside of the hole in the spray regulator. This is where the air comes out to spray the paint when you press the trigger (the paint comes out the hole in the tip, inside the spray regulator hole, when you pull the trigger back). When I removed the spray regulator, cleaned that little bit of paint out, then reassembled it, the airbrush worked like a charm!

Susan says I need arrows.  I will rework this post when I figure out how I am going to get arrows on my images.

Larry

Friday, March 27, 2015

Vintage Sunbonnet Sue Blocks

I inherited sixteen vintage Sunbonnet Sue blocks that were made by Myrtle Hattie Guier McDaniel, who was Larry's Grandma Vivian's mother-in-law.  Myrtle died at 80 in 1963, so I am guessing these blocks were made in the 1940s or 50s.  There are an even number of left and right facings "Sues", all with their hats embroidered.  Each block is completely unique.


I just love them, especially this pretty yellow girl.  The backgrounds are yellowed with age, though not stained.  Another chance for Retro-Clean to work its magic?  The blocks seem very strong yet, so I think they would hold up to being made into a quilt or wall hanging.


I am not sure what the protocol is for blocks of this vintage.  They are not terribly old.  I know it is recommended that antique blocks be preserved as is, but I cannot help thinking that Great Grandma Myrtle would have loved to see the blocks actually made into a quilt.  I love the little pink doggies in this dress.


The blocks are each 8.75" x 11", so sixteen of them with sashing and a border would make a nice child sized quilt or, more likely, a wall hanging.  I noticed each block of muslin has a line of holes from machine stitching all the way around the border, which I have learned is needed to prove they started out their lives as feedsacks.


I'll have to study the backs a little more closely because it looks as if the applique was embroidered down all the way along the edge with a visible outline around each appliqued piece.  I have never seen Sunbonnet Sues constructed in this fashion before.  


In addition to the sixteen completed blocks, there are sixteen sets of Sunbonnet Sue pieces all cut out and sewn together neatly in order.  Grandma Myrtle was a tidy worker.  I wonder how long they have been basted together like that!?


How fun would it be to put these together in their own quilt someday?

I finally finished Clue 3 of Grand Illusion last night.  My next task is doing the second paper-piecing section on Harlequin Johnnie.  After working on all those Clue 3 units, it will be nice to do some simple paper-piecing for a change.

Thursday, March 26, 2015

Marcella - My very first Treadle

Look what followed me home from Green Bay at Christmas!  It is my very first treadle - a Singer model 66 from 1905 in its original case.  It was well cared during its 110 years, and works just fine now that Larry has replaced the belt.  All I had to do was dust it and clean out the drawers.


This wonderful gift is from my sister's mother-in-law, Ida Mae, and is named after Ida Mae's mother, Marcella.  You may remember Marcella, she is the great grandmother holding my niece in the picture for which Larry tatted a new frame.  Larry's first tatted commission made a terrific thank you gift for Ida Mae.


Isn't the face plate a beauty?  The motif matches the decals.  Ida lives next door to my sister, Cindi, and her husband, Dave, so we always visit with her whenever we are in town.  I have known Ida Mae for nearly forty years - Dave used to bike over to our house.  Cindi and Dave moved into his grandmother's house a few years ago and this came with the property.


Now Cindi is about as likely to ever treadle as she is to go scuba-diving under ice, so it was really just taking up space.  We dug it out of their closet last fall when we flew up for a family reunion.  They offered it to us (with Ida's permission) and Larry and Dave took it completely apart at Christmas, then we drove it back to Texas.


The decals on the machine are in great shape but the bed shows lots of wear, so I can assume Marcella was a keen seamstress in her day.  I do not know for certain, but I do not believe she was a quilter.  I will have to ask Ida. We have no plans to refinish the head; it is in too good of shape and holds too many memories.  The quartersawn oak veneer is another story; it has a few issues.  Someday I hope to strip it and bring it back to its former glory.

It is really precious to me.  I have fond memories of Dave's Grandma Marcella from the very early 80s, and Ida Mae is a very special lady.  I am so glad we get to welcome Marcella the treadle into our home.

Wednesday, March 25, 2015

Handkerchief with Tatted Edge

I'm still plowing through the final units of Grand Illusion Clue 3 so I really do not have much new to show yet for all that hard work. The end is near, though, and I am looking forward to it.

Grandma Vivian did the tatting on this vintage handkerchief, and I sewed it on for her.  This time I sewed it on by machine.  I think it looks a bit better but feels like it has a thicker edge, so there is rather a trade-off.

Grandma's tatting is a little more startsie-stopsie than it used to be, but still plenty amazing for 103. This means more knots, which means lots of ends to work into the edge stitch.  Doing this by machine took forever, and I still missed incorporating many loose ends.  It also had serious gaposis in places.  I ended up stitching in the leftover loose ends and remaining gaps by hand.


The linen was somewhat yellowed, especially compared to the white tatting.  I soaked it for a few days in a small leftover Retro Clean soak that had almost completely evaporated from sitting in the spare bathroom for a month or two.  I revitalized the old soak water with hot water and a bit more Retro Clean, then put in the handkerchief.  After a few days of soaking, it came out nice and bright.

One good ironing later and it was folded up to show Grandma.  She was pleased that I had finally finished the sewing.  It will make a nice little addition to the wedding gifts that Grandma has prepared for my two nieces.